- 7 Jun 2026
- Gideon Thornton
- 0
Oven Installation Safety & Readiness Calculator
Project Profile
Pre-Flight Checklist
Calculating...
0%Please fill out the form above.
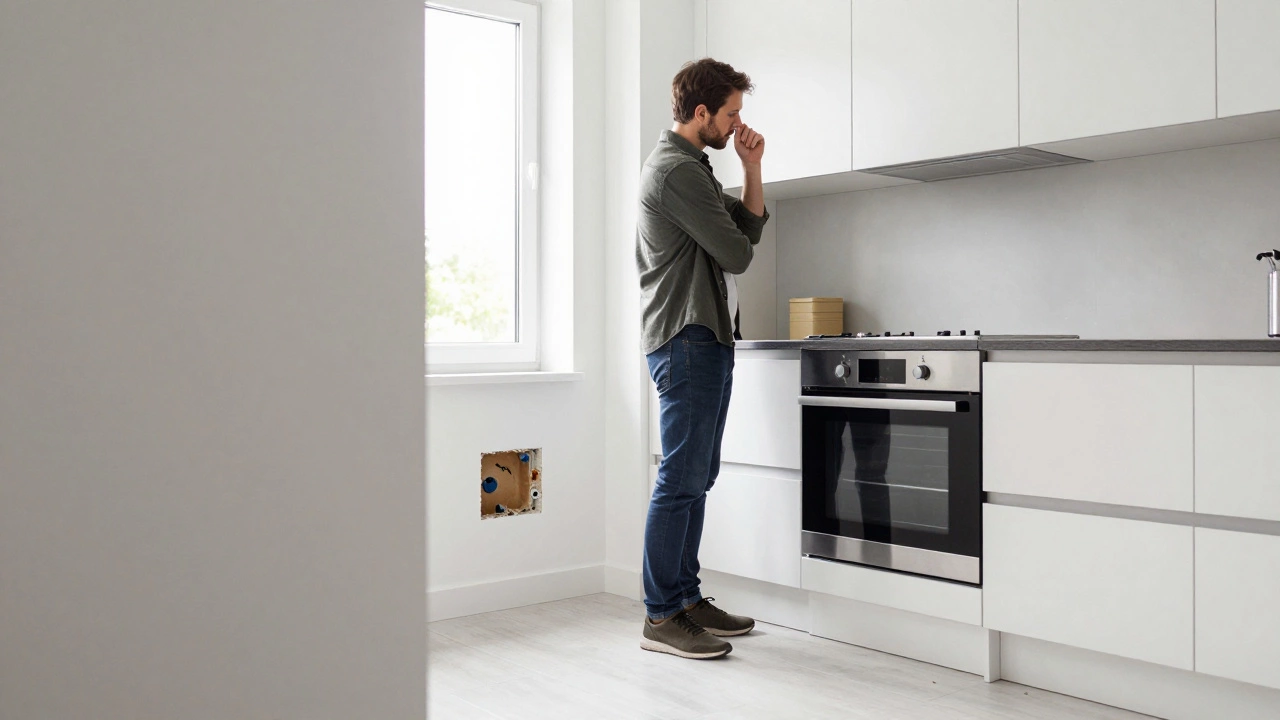
Imagine standing in your kitchen with a brand-new electric oven is a large kitchen appliance used for baking and roasting that operates on electricity. sitting on the floor, waiting to be installed. The old one is dead, and you’re staring at the empty wall cavity. The thought crosses your mind: “Why pay a professional hundreds of dollars when I can just plug this in?” It’s a tempting idea. But before you grab a screwdriver, you need to ask yourself if you actually know what you’re doing with high-voltage electricity.
The short answer is yes, you *can* replace an electric oven yourself. But the longer, more important answer depends entirely on your skill level, your local laws, and the specific type of connection your home uses. Getting it wrong doesn’t just mean a broken oven; it means fire hazards, electrocution risks, and voided insurance claims. Let’s break down exactly what goes into swapping out an oven so you can decide if this is a weekend project or a job for the pros.
Know Your Oven Type: Slide-In vs. Freestanding
Not all ovens are created equal, and knowing which one you have is the first step in deciding if you can handle the install. There are two main types you’ll encounter in most homes.
Freestanding Ovens are the traditional workhorses. They have legs, a back panel, and often come with a cooktop surface built-in. These units usually sit between cabinets but aren’t attached to them. Because they are self-contained, replacing them is generally easier. You pull the old one out, slide the new one in, and connect the power. If you have a freestanding model, you’re halfway to a successful DIY job.
Slide-In or Built-In Ovens are designed to look seamless with your cabinetry. They don’t have front-facing legs or heavy backsplashes. Instead, they slide into a cutout in your countertop or cabinet base. Installing these requires precision. You need to ensure the opening is the exact size, manage the door swing (some open left, some right), and sometimes deal with complex wiring harnesses that connect to external control panels. If you have a slide-in model, the margin for error is much smaller. One wrong move, and you’ve cracked your granite countertop or misaligned the doors.
| Feature | Freestanding Oven | Slide-In / Built-In Oven |
|---|---|---|
| Difficulty Level | Low to Medium | Medium to High |
| Cabinet Modification | Rarely needed | Often required |
| Wiring Complexity | Standard cord or hardwire | Hardwired only (usually) |
| Weight Handling | Heavy, but stable | Extremely heavy, awkward balance |
The Electrical Reality: Voltage Matters
This is where most DIYers get into trouble. An electric oven typically requires 240 volts of electricity, which is significantly higher than standard household outlets. This isn’t like plugging in a toaster. In many regions, especially in older homes or specific countries like the UK and parts of Europe, ovens are hardwired directly into the house’s electrical system. In the US, you might see a heavy-duty plug, but even then, the outlet must be rated correctly.
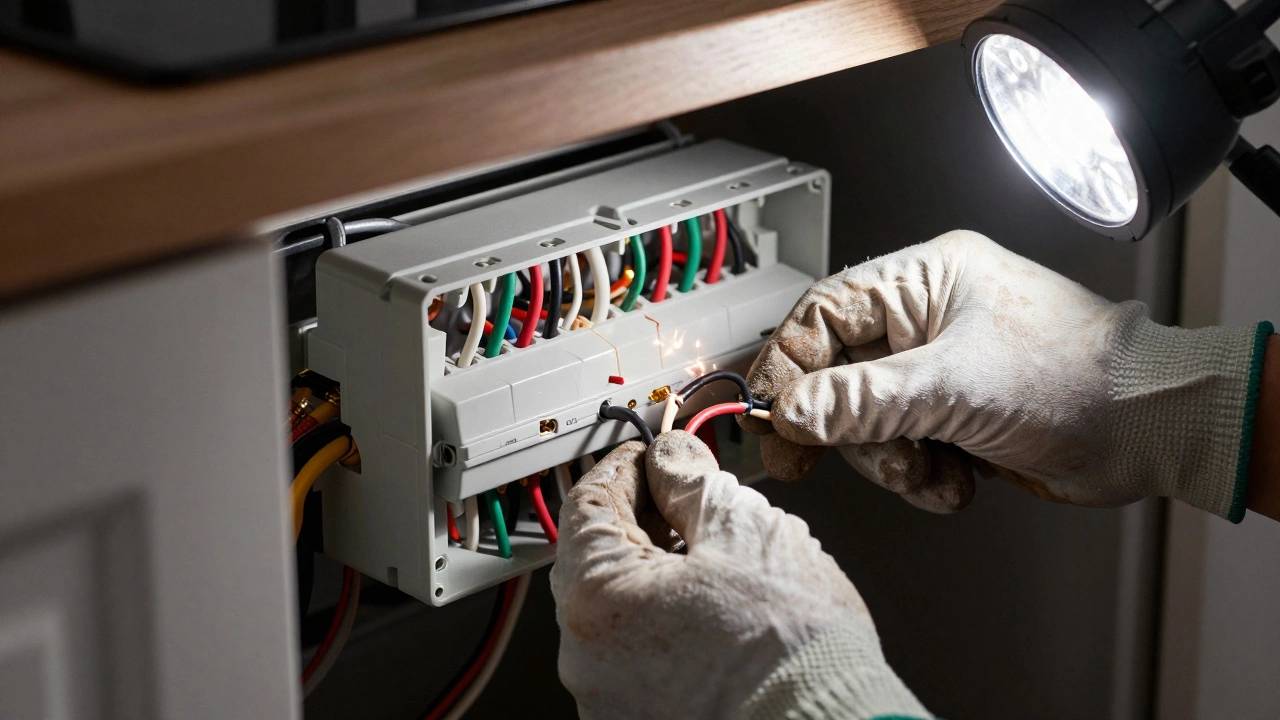
If your oven has a plug, check the amperage. Most modern electric ovens require a 30-amp or 40-amp circuit. Using a standard 15-amp outlet will blow the fuse immediately or, worse, melt the wiring inside the walls. If your home has a hardwired setup, you are dealing with live wires that carry enough current to cause severe injury or death. You must turn off the power at the circuit breaker is the safety switch in your electrical panel that cuts power to specific circuits. before touching anything. And I mean *off*. Test the wires with a voltage tester to be absolutely sure. Assuming the breaker is off without testing is how accidents happen.
In the UK and Ireland, regulations are stricter. Under Part P of the Building Regulations, any fixed electrical work in kitchens must be notified to building control unless done by a registered competent person scheme member (like NICEIC). This means legally, you cannot simply wire up a new oven yourself unless you are a qualified electrician or you report the work and pay for inspection. Ignoring this can invalidate your home insurance and make selling your house difficult later.
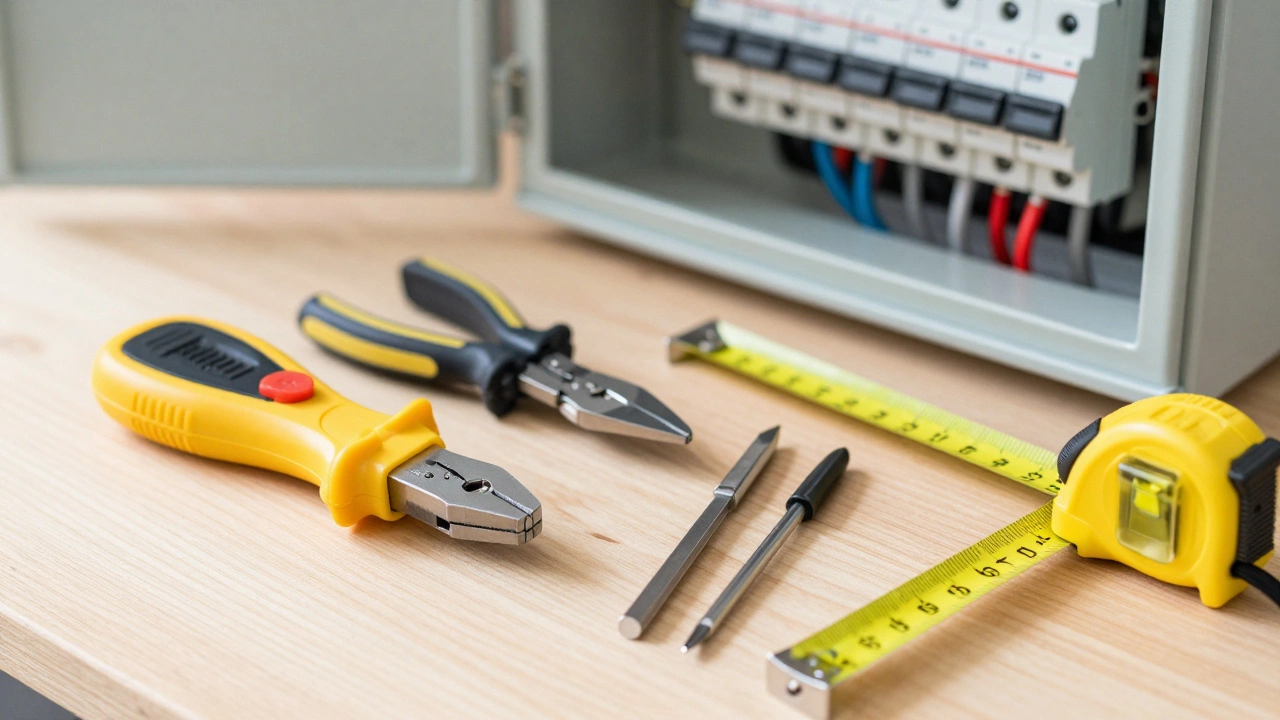
Tools and Prep: What You Actually Need
Before you start moving heavy appliances, gather your tools. You won’t need fancy equipment, but having the right basics makes the job safer and faster.
- Voltage Tester: Non-negotiable. Use this to confirm the power is dead before you touch any wires.
- Screwdrivers: Both flathead and Phillips head, preferably magnetic tips to keep screws from falling into dark corners.
- Wire Strippers and Cutters: Essential if you’re hardwiring. You need clean, precise cuts.
- Measuring Tape: To verify the width, height, and depth of the space. Remember, clearance matters for ventilation.
- Level: An oven that isn’t level can affect cooking performance and door alignment.
- Helper: Electric ovens weigh between 60 and 100 pounds (27-45 kg). Trying to lift one alone is a recipe for back strain or dropping the unit on your foot.
Clear the area around the old oven. Remove any shelves or racks from inside to lighten the load. Take photos of the existing wiring connections before you disconnect anything. This sounds trivial, but when you’re staring at three colored wires and a manual that assumes you know what you’re doing, those photos are lifesavers.
Step-by-Step: Removing the Old Oven
Removing the old unit is often harder than installing the new one. Here’s how to do it safely.
- Turn Off Power: Go to your electrical panel and flip the breaker labeled “Kitchen” or “Oven.” If labels are missing, test each breaker until the oven display dies. Then lock the panel or put a note on it so no one flips it back on while you’re working.
- Disconnect the Wiring: If it’s plugged in, unplug it. If it’s hardwired, remove the cover plate on the junction box. Unscrew the wire nuts connecting the oven wires to the house wires. Pull the wires free and tuck them back into the wall cavity.
- Release the Mounting Brackets: Many ovens are secured to the countertop or side cabinets with brackets. Locate these screws (often hidden under trim pieces) and remove them.
- Pull Out the Oven: With your helper, grip the oven firmly. Pull straight out. Don’t jerk it. If it sticks, check for hidden cables or adhesive strips. Once clear, tilt it slightly to clear the floor threshold.
- Inspect the Space: Now that the old oven is gone, check the hole. Is it square? Are there damaged wires or debris? Clean it up. Measure again. Does the new oven fit?
Installing the New Oven: Precision and Patience
Now comes the fun part. Or the frustrating part, depending on how well your measurements matched reality.
- Position the New Oven: With your helper, carefully maneuver the new oven into place. If it’s a slide-in, align it with the mounting brackets or shelf supports. Do not force it. If it doesn’t fit, stop. Forcing it can damage the frame or the surrounding cabinets.
- Connect the Power: This is the critical step. If you’re hardwiring, match the colors. In the US, black/red go to hot terminals, white to neutral, green/bare copper to ground. Tighten the screws securely. Loose connections cause arcing and fires. If you’re plugging in, ensure the plug seats fully into the outlet. No half-measures.
- Secure the Unit: Attach any mounting brackets provided with the new oven. These prevent the oven from tipping forward when the door is opened. Follow the manufacturer’s instructions exactly. Some models require screws into the countertop, others clip onto side cabinets.
- Level the Oven: Place your level on top. Adjust the feet if available. An uneven oven can cause the door to sag over time, leading to heat loss and poor sealing.
- Restore Power: Go back to the circuit breaker and flip it back on. Turn on the oven. Check for error codes. Run a quick heating cycle to ensure the elements glow evenly.
When to Call a Professional
Even if you feel confident, there are scenarios where hiring a pro is the smarter choice. Recognizing these limits saves money in the long run.
- You Don’t Have a Helper: Lifting 80+ pounds alone is risky. If you don’t have someone strong enough to assist, call a pro.
- The Wiring Looks Wrong: If you see burnt marks, melted insulation, or unusual wire configurations, stop. This indicates underlying electrical issues that need expert diagnosis.
- Local Laws Require It: As mentioned, in places like the UK, DIY electrical work in kitchens is heavily regulated. Check your local building codes.
- You’re Upgrading the Circuit: If your new oven requires a higher amperage than your current circuit provides, you need to upgrade the wiring and breaker. This is strictly electrician territory.
- You’re Uncomfortable: If you hesitate at any point, trust your gut. Electricity doesn’t forgive mistakes.
Common Pitfalls to Avoid
Mistakes in oven installation are rarely minor. Here are the most common ones people make.
Ignoring Clearance Requirements: Ovens generate heat. Manufacturers specify minimum distances from combustible materials like wood cabinets or vinyl flooring. Violating these clearances can lead to discoloration, warping, or even fire. Always check the manual for side, top, and bottom clearance specs.
Using the Wrong Wire Gauge: Thinner wires can’t handle high amperage. They heat up. If you reuse old wiring that was meant for a lower-power appliance, you’re creating a fire hazard. Ensure the wire gauge matches the oven’s amp rating (e.g., 10-gauge for 30 amps).
Forgetting the Ground Wire: Never skip grounding. It’s your last line of defense against electrical shock. If the old oven didn’t have a ground, your home’s electrical system needs updating before you install the new one.
Assuming All Plugs Fit: Not all oven plugs are universal. Some have four prongs, some three. Some are twist-lock, some standard. If the plug doesn’t fit the outlet, don’t modify it. Call an electrician to install the correct receptacle.
Final Checks Before You Cook
Once the oven is installed, don’t just start baking cookies. Perform a final safety check.
- Smell Test: When you first run the oven, a slight burning smell is normal as dust burns off. But a sharp, acrid smell of melting plastic or ozone means something is wrong. Turn it off immediately.
- Door Seal Inspection: Close the door and shine a flashlight inside. If light leaks out, the seal is compromised. Heat escapes, efficiency drops, and the oven works harder than necessary.
- Control Panel Functionality: Test all buttons and dials. Ensure the display lights up clearly. If error codes persist, consult the troubleshooting section of the manual.
- Stability Check: Gently push the oven. It shouldn’t wobble. If it does, adjust the feet or re-check the mounting brackets.
Replacing an electric oven is a manageable DIY project for those with basic electrical knowledge and physical strength. But it’s not a task to rush. Respect the power involved, follow the instructions, and prioritize safety over speed. If you ever doubt your ability to complete a step safely, pause and call a professional. Your home-and your family-depend on it.
How much does it cost to hire a professional to replace an electric oven?
Costs vary by location and complexity. On average, expect to pay between $100 and $300 for labor. This usually includes removing the old unit, installing the new one, and checking the electrical connections. If new wiring or a circuit upgrade is needed, add $200-$500. Always get a written quote before starting.
Can I use an extension cord for my electric oven?
No. Never use an extension cord for an electric oven. Ovens draw high current, and extension cords are not designed to handle this load continuously. This creates a significant fire risk. The oven should be plugged directly into a dedicated, properly rated outlet or hardwired into the circuit.
Do I need to turn off the gas supply if I’m replacing an electric oven?
If you are replacing an electric oven with another electric oven, no gas work is involved. However, if you are switching from gas to electric or vice versa, you will need to cap off the gas line or install a new gas line. This requires a licensed plumber or gas fitter and is not a DIY task.
What should I do if the new oven doesn’t fit the old space?
Do not force it. Measure the cutout dimensions precisely. If the new oven is wider, you may need to modify the cabinetry, which involves woodworking skills. If it’s narrower, you might need filler panels to maintain aesthetics. Consult the manufacturer’s installation guide for recommended modifications.
Is it safe to leave the oven door open while cleaning after installation?
Yes, but be cautious. Leaving the door open allows heat to escape and prevents overheating during the initial burn-off phase. However, ensure children and pets stay away from the hot interior. Also, check if your oven model has a specific recommendation for post-installation cleaning in the manual.